SEVEN DAY CYCLIST
CYCLING, BUT NOT USUALLY RACING
LATEST UPDATE April 17th 2026
HOW DO WE REACH THE OVERALL RATINGS FOR PRODUCTS WE REVIEW?
THIS SITE USES GOOGLE ANALYTICS TO ANALYSE TRAFFIC. CONTINUING TO USE THIS SITE MEANS YOU ACCEPT THE USE OF COOKIES.WE DO NOT COLLECT PERSONAL DATA LEARN MORE OR SEE OUR PRIVACY POLICY
WHEEL BUILDING, PART ONE
THEORY AND PLENTY OF PRACTICE
When the wheel of fortune turned against Michael Stenning, it proved to be the excuse of a rebuild.
Wheels are incredibly sophisticated feats of engineering. Once all good wheels were built by hand but, as with frames, advances in technology means machine built wheels, even those found on budget bikes are pretty serviceable these days. That said; there is still plenty of demand for bespoke wheels. With a bit of practice and skilled instruction, wheel building isn’t the black art many believe.
Wheels of Confusion
Once upon a time, factory meant low rent wheels, built by machines. Machines can tune things to specific tolerances, literally building by numbers but a skilled human can deviate from the script, resulting in a stronger, more reliable wheel. Contemporary factory-built wheels are produced to manufacturer specification by highly skilled people.
If you’re looking for a good quality, off the peg wheelset for your race, gravel, or track bike, this may be the most cost effective route. Bespoke wheel building remains relevant for riders needing something specialist. Maybe you’re a very powerfully built sprinter, an expedition tourist, or perhaps your rim’s trashed and you’ve a high end hub? All times when bespoke is best.
Horses for Courses


Like any kind of build project, purpose is crucial before you start harvesting components.
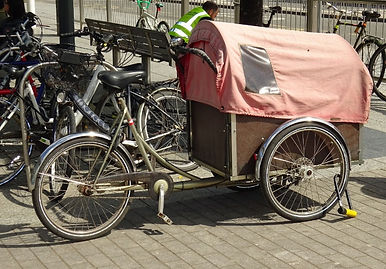
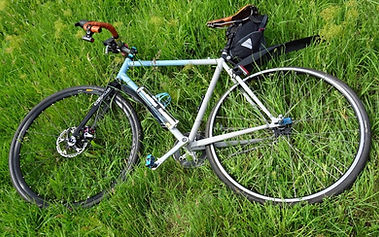
The demands placed on a TT bike are entirely different to those of an expedition touring lorry, such as TEGAN PHILLIPS' SURLY DISC TRUCKER or cargo bike expected to manage 80kilos of rider plus thirty kilos of kit.

Up until the early 1980s, most wheels for solos, regardless of purpose used 36 spokes. Some touring bikes and specialist builds used 40, competition wheels ran 32. Nowadays, it can be 28. 24 and in some cases 16 spokes but going this low has other implications. Much will depend on end user and builder skill. A badly built wheel is a badly built wheel regardless whether it has 24 spokes, laced two cross, or 48 laced five.
Chances are, at least with plain gauge spokes, it’s usually possible to ride home/back to base on a 32 hole without losing too much tension, or truth. Most road and cross country mountain bikes use 32 holes, front and rear, which works pretty well, most of the time. 32 rear; 28 front may be perfect for some riders. A good shop/wheel builder is probably the best starting point, if you’re exploring options.
Components
Rims
Rims connect us, via the tyre, with the road surface. Mass and aerodynamics will dictate how much effort is needed to keep the wheel in motion. Heavier wheels require more effort when accelerating but as I’ve said before, rider weight, power and bike purpose are equally important factors to consider.
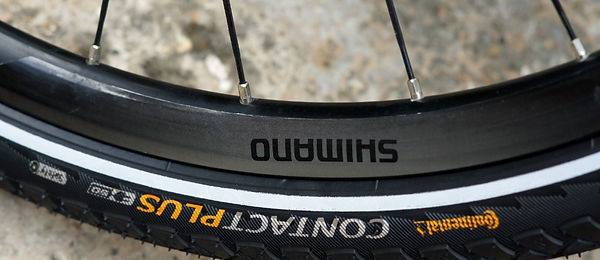
A deep section rim such as these Halo and Shimano will generally respond faster and also permits higher spoke tension, although there is some trade off in terms of ride comfort.

A more basic place to start is size and ensuring your chosen rim will fit your frame. Often, old fashioned 27inch rims can be upgraded to 700c with minimal impact upon geometry and handling. My Holdsworth TT bike is a prime example, although admittedly, I went for a cheap but cheerful thread-less, carbon fork up front.

On some old school centre and side pull brakes, the pads may drop low enough to hit the rim squarely, or a longer calliper may be the only, minor expense. However, things get pricey when we’re talking moving braze-on bosses, new paint etc.
As discs have become mainstream, it is also possible to run 700c wheels with mountain bike frames, useful if you want a quick agile commuter during the week, cross country mountain bike on the weekends. However, remember this will require the frame sporting suitable mounts/adaptors.
Another trend that has crept in slower than I’d expected is tubeless. These have several advantages. Firstly, tyres can be run at lower pressures for greater traction without rolling off the rims and they are arguably more puncture resistant than the humble butyl tube. They will also accept a tube too.
Tubeless conversion kits are pretty good and increasingly inexpensive. That said; if you’re serious about taking this route with new hoops, it’s worth going a few millimetres wider. I’m talking about the rim’s internal diameter. Why? Well, this is to improve the tyres profile, especially off-road.
However, racers may not want to exceed a couple of millimetres over their existing set up. Double walled box section aluminium alloy models with 32 eyeletted spoke holes and an internal diameter of 17-19mm are a good starting point for general road, cross, gravel and weekend touring.
In this context, I tend to err on the side of slight overbuild in the interests of longevity. It should also go without saying that rims should also correspond with the hub’s number of spoke drillings.
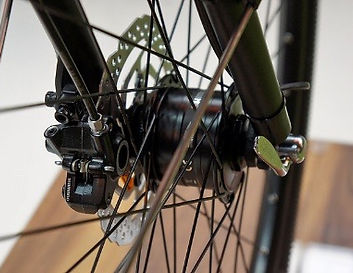
Hubs
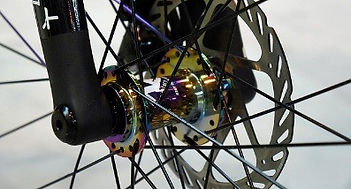
It is often thought that hubs are the most important part of a wheel. True, it handles considerable loads and is subjected to all manner of crap. That said; there are other things to consider. Given the stresses presented through radial spoking patterns, some manufacturers will decline to honour warrantees if the wheel has been laced this way.

Big flanges provide a lot of stiffness, hence their popularity with track racers. However, they also translate into a slightly harsher ride. Not what you’d want on a touring bike.
Talking of which, there’s a lot to be said in favour of hub dynamos. If you’re going this route, I’d go for a 6volt mode, which will generate a much better pool of useable light at lower speeds, especially if you’re only running a headlight from it. Schmidt and Shimano make some very smooth, durable systems.
Whatever hub dynamo you go for, bear in mind the old adage buy cheap, buy twice. Sealed cartridge bearings are a definite plus but consider how easy strips downs/replacement parts are if you’re going the blue yonder route.
Some folks run track hubs on road going fixed gear builds. Fine but the lack of weather seals requires stout greases and regular strip downs. Personally, sealed systems are more practical, especially through the depths of winter. Cartridge bearings are very long-lived. Some are truly fit 'n’ forget, with no scope for adjustment, others can be tweaked to take up any play.
Think about gearing too. With 11 speed derailleur set ups increasingly common, it might be prudent to go this route and use a spacer with an existing 10 speed group, for example. On the subject of spacing, ensure that the axles are also compatible with your frame/fork ends. Most forks are 100mm wide. At the rear triangle, road drop outs use 130 and mtb 135mm. However, there are exceptions, so measure twice before making the financial commitment.
A competent frame builder, or highly skilled shop mechanic will usually be able to cold set a rear triangle. For example from 126mm to 130mm, which is what I would need to do, were I going to use a contemporary road group on my 1991 road frame.
Spokes & Patterns

Spokes
Stainless steel and brass nipples are the obvious starting points. However, carbon fibre, aluminium and titanium are becoming increasingly popular alternatives. Chrome is a purist route, say for concors restoration of an 80’s road bike.
However, they can become brittle and need a periodic wipe-over with an oily rag to keep tarnish at bay. Not a practical option for training and more general riding. Galvanised, sometimes called “rust-less” spokes are only found on bargain basement wheels. Functional; enough but they eventually corrode and aside from industrial orders, the price differential means stainless wins hands down. Bladed, sometimes referred to as “aero spokes” are common on high end race/TT. Theory goes, they cut through the air more efficiently but their profiles also permit higher spoke tension.
I’ve tended to plump for plain gauges (Where the spoke’s thickness is consistent throughout). All things being equal, doubled, (or triple) butted may be lighter and in some respects stronger.
However, in the event of a breakage, a wheel built using plain gauge spokes will remain true, which could be a godsend, especially mid tour, or when it’s lashing down on a Saturday night and the bike shop’s closed.
Radial spokes
These look cool and may be lighter and have some aerodynamic advantage, so worth considering on a TT bike. Only on the front wheel and not if you’re running a hub or disc brake! This pattern also places additional strain upon the hub flanges, which if left unchecked could lead to their failure.
Part Radial
Conversely, part radial (non-drive side) patterns have some weight benefits for rear (derailleur) wheels. The more sprockets, the more “dish”. This can accentuate fatigue and ultimately, broken spokes. With a half-radial pattern, there is marginally less dish to begin with, so long as you have run the radial spokes along the inside of the hub flange.
Disc or hub brakes are another non-starter, since spokes have to resist forces from both sides. A flip flop, or double fixed hub should never be built this way either, unless of course it has a very large diameter shell.
Semi Tangent

This is where spokes cross each other. 2X means that each spoke crosses two others running from the same hub, 3X crossing 3 others, 4X four etc. Higher numbers in this instance makes the spokes resistant to stress - say grinding up a climb in a low gear with a week’s worth of supermarket shop in a trailer.
This is particularly significant for heavier riders and/or if you’re running disc brake or hub brakes. As a rough 'n’ ready guide, I’d suggest 3x for commuting, touring - 36 hole rims, at least at the rear. 2x is adequate for racing, unless you are a 90 kilo sprinter, or just harder on your bike. Bear in mind that the number of crosses will influence spoke length. For example, a 2x pattern may be 282, going the 3x cross route, using the same hub will require spokes of 294mm.
Calculating spoke length
Like most things, there’s the “proper”, failsafe way of measuring, which takes everything, including rim depth into account. Thankfully, there are a wealth of online calculators, which makes life a lot easier. Select your rim, hub and spoke pattern. Obviously convenient, they won’t cover every eventuality and I’d still double check with your friendly local wheel-builder to avoid inconvenience and wasted cash.
Case study
After twelve year’s loyal service, massive mileage, one spoke breakage and only two true-ups, my fixed gear winter/training bike’s rear rim succumbed to fatigue. First indication was a blow out several miles from home. With a fresh tube instated, I was stunned to discover a samba dancing rim.
On the jig and a few turns of the spoke key later, save for a minor flat spot, the wheel was round again. Reinstating the tyre and introducing a modest 85psi caused the box section rim to warp irreparably - literally before my eyes!

Enter a silver 32 hole Mavic Open Pro rim that had been doing something close to nothing in my workshop. The Open Pro is something of a classic. Relatively lightweight, though sturdy road rim, so a good default for my 70 kilo frame and bike purpose.
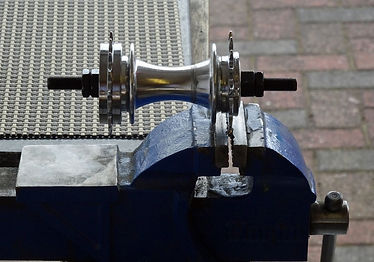
The existing hub seemed in pretty good shape, bearings were smooth and seemingly well-greased. Having calculated the spoke lengths, Lloyd at Ison distribution www.ison-distribution.com kindly gifted me 33 black Halo plain gauge stainless spokes.
Cutting the double fixed hub free from the wreckage revealed a less favourable truth. Unfortunately, despite regular greasing, the threads were beginning to recede and the right side lockring had become right royally seized…


However, the universe works in mysterious ways. John Moss contacted me in a different context and said he had two virtually unused fixed hubs, bought for his Mango Velomobile…
This run of luck continued when we discovered, one was a 32 hole and a fully compatible with the Mavic rim and spokes-result! Having liberated his fixed and freewheel sprockets using his portable vice and home brewed chain-whip.