
SEVEN DAY CYCLIST
CYCLING, BUT NOT USUALLY RACING
LATEST UPDATE June 17 2026
HOW DO WE REACH THE OVERALL RATINGS FOR PRODUCTS WE REVIEW?
THIS SITE USES GOOGLE ANALYTICS TO ANALYSE TRAFFIC. CONTINUING TO USE THIS SITE MEANS YOU ACCEPT THE USE OF COOKIES.WE DO NOT COLLECT PERSONAL DATA LEARN MORE OR SEE OUR PRIVACY POLICY
Blessings in Disguise: Introducing “Muffin the Mule”
Spring has, at least for the last 35 years been synonymous with strip downs, refurbs and similar projects. However, Easter reminded me that even simple builds can be consumed by the salt monster, wet lubes and related grot.

All that’s shiny…
I’d recently fitted a new chain to my relatively clean fixed gear winter trainer with a seemingly solid drivetrain. However, despite much fore and aft shuffling of the rear wheel and gentle tweaking of the chain tugs, tension was either er, too tight, or too slack or…

Sometimes, the best route forward is to take a break, go right back to basics, strip stuff down and inspect thoroughly. Superficially, the frameset and components were clean and in very sound condition. Then, while inspecting the Genetic Tibia ring, my left index finger felt some very tangible flaky grittiness around the chainstay bridge.

Not grime, rather a mix of peeling powder coating and corrosion. On the one hand liberal helpings of waxy preserves should keep the water and generic crap thrown up along winter roads in check, ditto grease on the Allen bolt I’d deployed as another barrier.
Despite these measures some moisture had found its way inside and got trapped…Had it worked deep into the chainstays? Was the frame still structurally sound? If life generally has taught me one thing, it’s the importance of confronting things head on and pardon the pun, not letting them fester.
Strip & Inspect
Given my love of oily preserves and stout greases, I wasn’t remotely surprised to find the Genetic Tibia cranks popping off with only moderate effort. To my astonishment, the chain ring bolts, despite being fitting some seven years back still sported a healthy amount of Park Tool Polylube 1000. I decanted these to a magnetic bowl, lest the neighbour’s feline come to play.
The ring was indeed toast but certainly owed nothing.

Being 144BCD, there’s ample choice and I went for a third party 42tooth offering. I’d toyed with going the stainless route for greater durability, but 6061 aluminium alloys seem to strike a decent balance between price and longevity.
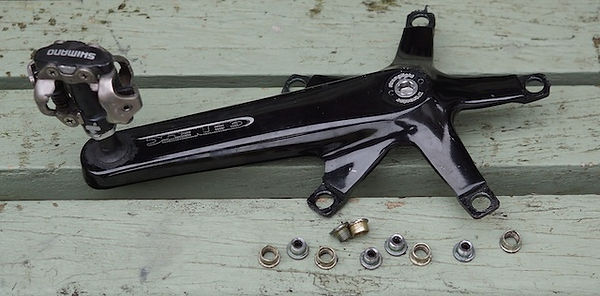
The UN55 cartridge bearing slithered out with buttery finesse courtesy of my long-handled Lezyne wrench. Again, a liberal helping of Park remained on the cups, not to mention very molten Waxoyl sloshing from the shell. Seat post, stem followed allowing a thorough, unhindered inspection.
History
I’d bought the frameset new back in 2005 but had been smitten with the idea of an ultra- practical cyclo cross inspired fixed gear frameset since 2003. Track ends and spacing, clearance for 35mm tyres, powerful cantilever braking, mudguard, rack and bottle mounts, pump peg anyone?
I’d enjoyed every minute aboard it for the first ten years. At that point, some nasty looking surface corrosion peppered the right hand chainstay. Maldon Shot Blasting & Powder Coating came to the rescue with this two-tone makeover, which has served us very well since.
I form strong bonds with my bikes, although frames specifically, so really didn’t want to retire or (gulp) scrap one. However, I’d kept a replacement in the wings, just in case something should happen, and my friend prove beyond economic repair. My feelings were to switch everything over to the Mulo, giving me chance to thoroughly inspect the V2, solicit professional advice and then make a sensible, considered and cost-effective decision concerning its future.

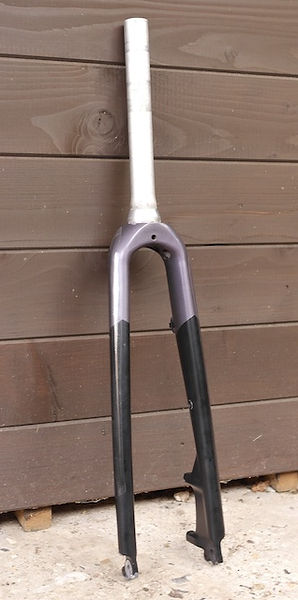
The replacement in question is essentially a modernised version but whereas the V2 took its cues from a traditional cyclo cross bike, the Mulo is closer to a fixed gear gravel build. The Mulo also features a lofty bottom bracket, which suits me just fine and wasn’t problematic with its predecessor. Clearances for 40mm tyres, beefier CNC machined dropouts, 31.8mm downtube and oversized head tube. The latter supposedly translate into stronger front end without being unduly harsh.
It does mean a tapered steerer tube (assuming you didn’t want to go for a reducer.) I had a suitable fork “in stock”, a set from an e-bike. Suitably overbuilt, it sported carbon blades, aluminium alloy crown and steerer. I just needed a compatible Aheadset. Integrated headsets look very sharp but also allow some manufacturers to cut corners-I’ve seen some pricey bikes with very cheap, caged ball headsets.
Pre-Build Prep
Helicopter tape is a great investment but does take time to apply. The Mulo has sat in a heavy-duty plastic cover at room temperature since its purchase. No wax, or anything on its wet spray finish. Assuming you’ve not gone the pre-cut route, be sure to trace the outline with a marker before cutting helicopter tape to size and shape. There are a wealth of brands on the market but I’ve found Zefal Skin Armor an excellent go-to.
Always round the edges. If you leave them square, you run the risk of dirt, water and contaminant creeping beneath and ultimately, lifting it. Using a hairdryer on a medium heat will turn it supple, making it easier to apply. When it comes to carbon, keep the drier a little further way and on a lower heat setting.
Use a clean, dry cloth to smooth it down. I’ve applied some to the head and down tube, fork but opting for old butyl inner tube at the seat and chainstays. Less aesthetically pleasing, in my experience, scrap butyl can be found pretty much anywhere, is dirt cheap and offers excellent better protection from impacts, such as stones and where heavier accessories, such as mudguards rest against the frame.
I left the frame for 24 hours and then liberally treated it internally with Supatrol - a waxy corrosion inhibitor - leaving the frame overnight atop old newspaper to collect any that might seep from breath holes, bottom bracket shell etc.
Front End

Having checked the fork steerer length and pruning it down using a guide setter and fresh hacksaw blade, leaving a little scope for musical spacers. Next came a cartridge bearing headset. Now, my Cyclo crown race setter was only suitable for 1 and 1/18th. Not wanting to damage the crown race, or buy another tool, I took the fork and race to my local mechanic- a twin pack of biscuits sealed the deal. I returned and pruned the steerer tube by 2.5 cm (a good guestimate, rather than exacting pre-cut measure, which paid off).
Cartridge bearings and races were treated to a liberal slathering of Juice Lubes Bearing Juice, and I slid three spacers in situ before mounting the stem, loosely setting the preload and pinch bolts to eliminate any risk of the fork slipping out and clattering to the floor.
Turning the bars, everything felt buttery smooth, so I turned my attention to installing the brake calliper. I needed to remove the cable and feed it through the fork’s cable guide but otherwise just a matter of switching the calliper over from IS to post mount.
More bearings

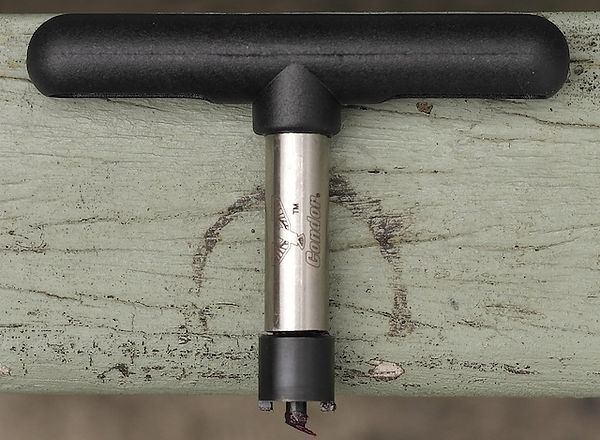
While I awaited a fresh chain ring and 17tooth Halo sprocket, a new UN55 bottom bracket was given a similarly general helping of Oxford Mint Assembly Grease then wound effortlessly into place, using this long handled CNC machined tool and similarly refined Shimano pattern end.

More Deviations & Surprises

The Mulo’s bigger clearances inspired me to switch the fixed’s road-centric 32/28mm rubber for some 40mm Continental. Greater surface area, compliant ride quality and impressive puncture resistance were the obvious draws. Effortlessly mounted, the courier had just delivered a shiny new 17tooth Halo sprocket, so I wasted no time mounting-with a light lick of grease to the hub and cassette style lockring.
Aside from keeping the elements out and making it easier to release, grease also ensures a reliable, thread friendly union when you’re winding it down to 40nm.
While fitting the wheels, I noted some serious reticence from the front skewer- it wouldn’t budge from the hub shell! The nutted end would thankfully loosen, so I removed this and gave the exposed skewer a liberal blast of maintenance spray- Muc-Off Bike Protect (link) since it was handy.
Next came a few taps from my trusty engineer’s mallet- it still wouldn’t slide free from the Shutter Precision (model) hub shell. A further blast of Bike Protect, wheel angled downward to aid penetration.
I waited a minute or two, then resumed judicious tapping, alternating between the quick release cam and exposed skewer. On the third attempt, it slid out from the hub body, I unleashed a suitably triumphant “huzzah!” which in turn, induced frenzied barking from the neighbour’s dachshund.
I cleaned the skewer, applied some Oxford Mint Assembly paste and slid everything back in situ. Save for applying some degreaser to the disc rotor and wiping clean, it was simply a matter of reintroducing the front wheel. Mercifully, the TRP Spyre calliper needed no attention-impeccably behaved.
Having tightened the rear track nuts to 25nm, I whipped the bike out of the stand and fine-tuned the headset bearings. Snugging the preload 1/8th of a turn each time until all slop was removed and everything turned freely, I reached for the torque wrench and tightened the stem’s pinch bolts to 6nm.
Schoolboy error

Seat post and saddle in, I decided to fit the let crank, adding a little grease to the self- extracting 8mm bolt and winding it home. The following morning, my new ring arrived, and I wasted no time fitting it.
On went the right-hand crank. To my surprise, the ring was nigh on flush against the chainstay - not even room for a message!!!
Hmm… I fitted the Mudhugger Gravel Hugger Mudguards and went for some lunch. Belly and brain fed, it suddenly occurred to me I might’ve mounted the ring inboard of the crank spider. Doh! (There’s a bit of Homer Simpson in all of us). I had indeed. Ring refitted the right way round, crank slid back on the taper and wound snug…Close but still a sensible gap - definitely not fag paper territory.

Chain Gang & Gearing
I pruned this Izumi 410 down a bit, checked and removed a few more links before joining and fine-tuning tension at the dropout screws. A drop of lube, a turn of the cranks and we were there. On balance some very minor slack is better than a little too much tension. Though simple, fixed transmissions take a fair loading, especially if like me, you only run a single, front brake. I’ve gone slightly lower on the ratio-69 inches, which gives a bit more torque in the hills without spinning out on the descents. Being as the Halo Fix-G hub is double sided, I could always opt 18, or 19 tooth sprockets, giving ratios of approximately 65 and 62 inches. For context, 63 inches is considered optimal for riding off road on a fixed. Yes, it’s a niche within a niche but with clearance for gravel rubber, such as the Maxxis Ravager , means exploring hardpack and forest trails is viable.

As benchmarks go, I’ve always found KMC Z1x incredibly reliable, ditto their much cheaper Z510HX but if weight’s less crucial, Gusset S-Link is another really solid option. I ran 3/32 on a conversion between 1988 and 1992 but would only consider 1/18th track fare these days.
Beast of Burden

I’d contemplated reverting to post mounted SQR luggage but settled on the rack route. The Topeak Uni Super Tourist 2.0 Non Disc Rack is a solid model capable of lugging 25 kilos. I always add a lick of grease directly to the frame eyelets and threads, a thinner layer to the fasteners.
Aside from ensuring everything comes together and apart easily, this forms a seal, blocking water and potential corrosion. This is particularly significant with drilled seat stays, rather than the braze-on external mounts, since moisture can collect inside the frame, presenting potential structural issues.
I default to the Topeak MTX Trunk Dry Bag and a bar bag for convenient access- tubes, multi tools but the ability to haul a 20 litre pannier and bulkier stuff is very welcome.
First Impressions & Silver Linings
Two hundred and fifty-miles hence, the overall ride quality is actually slightly superior to its predecessor. Muffin the Mule feels more responsive a little quicker on the climbs but without being remotely harsh, or skittish when descending. The V2 Muffin replaces was a great all-rounder. Engaging, yet comfortable and predictable on longer wintry rides, so an obvious choice for general riding. Factors such as tyre width and casing play their part, but Muffin gives a magic carpet ride, cruising with similar finesse, but lateral stiffness is palpably better, especially when laden and accelerating, or climbing hard.
Turn the cranks in anger and Muffin will respond gleefully and yet requires little effort to keep at a steady 17-20mph. The 69-inch gear is lower than I’d typically consider for road biased duties. 72-79 inches being my road going defaults. However, the lower ratio means quicker, knee-friendly climbing but without spinning to oblivion on the other side, although I’ve been inclined to engage the front TRP Spyre SLC stopper more readily.
Town manners, say when trickling through traffic, weaving around holes and similar obstacles is reassuringly good and the frameset’s responsive, though not twitchy persona means I can accelerate around hazards and out of trouble. While extremely fond of the V2, these revisions and developments are genuine improvements and for me, brought the concept bang up to date.
Improved tyre clearances mean I can run gravel rubber and indeed, 35mm Schwalbe Winter spiked tyres when things turn slippery. Though practical for general, traditional road biased training, the V2 would only manage 32mm, 35 at a push, if you were forgoing guards, or like me, running a design like these Mud Hugger Gravel Hugger . Essentially, there are some very genuine, tangible improvements over its long-serving predecessor.
Bedding in & Minor Tweaks

Even though the Genetic Tibia cranks are relatively short (165mm), thus minimising the likelihood of grounding, I’ve added some crank protectors-homages to the Zefal Crank boots since they were waved under my nose.

Better marginally looser than too tight. I was also having some issues with the TRP Spyre not biting properly, so switched to its loftier SLC stablemate, having treated it to a good clean and pad change. Modulation, feel and ultimately, stopping sorted. I was also having some issues with crank bolts working slightly loose. This isn’t uncommon, especially on single ring. A straightforward fix with a chainring collar tool and 5mm Allen key. Models such as this are generally effective and easily slipped in with the on-bike toolkit, although lack refinement. A few quid more buys something like this.
If you’re regularly replacing rings (or at least plan to), a workshop-biased design might be the best investment. Either way, the prongs slot into the rear collar, holding it steady while you torque down the Allen key, or T30 Torx. In a pinch, it’s sometimes possible to arrest the collar still with a thin flat bladed screwdriver but something of a gamble, so emergencies aside, not practice I’d recommend.
Things To Consider with Working & Winter Bikes
Working builds, however you want to characterise them aren’t necessarily extensions of a rider’s personality, but I’ve always found them more interesting than someone’s “best bike”. That out of the way…
Metal frames, though steels specifically, benefit greatly from internal corrosion inhibitors. Framesaver is something of an institution, but waxy automotive preps are also very effective. A few capfuls of 10w/40 motor oil will also offer some protection.
Save for when applying corrosion inhibitors, never block drain holes, since they’re designed to let moisture out. Continuing this theme, be mindful of those drilled fork leg and seat stay mounts, since these can also trap moisture, leading to internal corrosion.
Same goes for old school metal cable clips. Go for composites wherever possible and fit helicopter tape first. This goes for any luggage that touches the frame- big bar bags, frame fit bags etc. Wet, gritty stuff can get between the straps, quickly resulting in tan lines and nasty swirls in finishes.
Aside from blasting some corrosion inhibitor inside, keep the threads well-greased to minimise any chance of ingress. I would be inclined to have these filled and a more traditional braze on mount added to coincide with a respray, or similar renovation. Talking of which, I like plain finishes- pleasing on the eye, but understated and easy to touch up. Get the code and some identical paint so you have some on hand. Always apply a primer coat first- gives a better finish and improved protection.
A “boot” made from old butyl placed around the seat collar and headset bottom race will stop water and ingress creeping inside and may even extend grease’s service life-assuming you’re using a metal seat post.
Drivetrains
There are two schools of thought when it comes to working and winter bikes and both certainly have their merits. Some folks transplant wholesale to a new frame and replace ring(s), cassettes, chains, derailleurs, shifters, brake pads as they expire. The tradition of winter/working bikes built from Hand-me-down parts-stuff no longer crisp enough for racing but still reliable can be very cost effective. As this build illustrates, while some components - ring and sprocket specifically can get unobtrusively worn out, I prefer to replace parts that are coming to the end of their lives during the build, rather than wear them out and have to strip relatively quickly. Bottom brackets and headsets being prime examples.
Pedals
Dual sided SPD are my defaults, especially on a fixed, since I can just clip in and power off. No faffing and trying to flip the pedal round. Annoying enough following a B-road rest stop, let alone at the traffic light grand prix. However, a hybrid of flat and SPD might be a better fit for you and a geared working bike, should you want to scoot around in street shoes, or just flat soles now and then.
Wheels & Tyres
The four seasons, winter in particular can take their toll on wheels and tyres, so I like a little overbuild here. Sealed (but user serviceable hubs), 32-hole rims laced two, or three cross and sturdier rubber with a decent puncture repelling belt. Hub dynamos and bright lamps mean I have solid, reliable lighting on tap. I want to enjoy the rides, not tackling flats miles from home in the freezing cold, but still enjoy a responsive, engaging experience. I’ve become very fond of these Continental Pure Contact, which deliver a very compliant, plush, yet are surprisingly quick ride, while proving highly puncture resistant.
Reflections & Lessons Learned
All builds have their surprises and as is probably apparent, what started off as transplanting as much as possible from the old frameset, took various turns and a slightly different, but very welcome “end” result. End in quotation marks since most bikes tend to evolve over time, as components wear out and I’m notorious for tweaking and refining stuff. When it comes to winter, cyclo cross and indeed, mountain bikes, the elements can take a more serious toll. Internal frame preserves are an obvious defence, but I’ve been surprised by the amount of water I’ve seen leaching from a cyclo cross bike’s bottom bracket shell. This can, left unchecked, lay dormant within other tubes, causing structural damage. There’s a solid argument for having a drain hole drilled in the bottom bracket shell, such as this.

I’m keeping the V2 and will get its right hand chainstay area professionally inspected for structural issues. Though pragmatic, I also form very strong bonds with my bikes-many riders do. The rides we’ve had, the people, we’ve met, the places we’ve been, the milestones that run in parallel- qualifications gained, children, good times, bad times are almost etched within the tubes. Assuming the V2 is structurally sound and within economic repair, I will have a hole drilled in the bottom bracket, adding some braze-ons and the frame refinished.
Michael Stenning
PUBLISHED JUNE 2025


