SEVEN DAY CYCLIST
CYCLING, BUT NOT USUALLY RACING
LATEST UPDATE May 30 2026
HOW DO WE REACH THE OVERALL RATINGS FOR PRODUCTS WE REVIEW?
THIS SITE USES GOOGLE ANALYTICS TO ANALYSE TRAFFIC. CONTINUING TO USE THIS SITE MEANS YOU ACCEPT THE USE OF COOKIES.WE DO NOT COLLECT PERSONAL DATA LEARN MORE OR SEE OUR PRIVACY POLICY
WHEEL BUILDING, PART TWO: JOHN MOSS TO THE RESCUE
After many years of faithful service, Michael Stenning's mile-muncher gave up the ghost with a collapsed wheel. In Part One he looked at the theory and got started on repairs, but ....
So, with Mavic Open Pro hoop and spokes in hand, I nipped down to John Moss's house for the double fixed hub. I was tempted to go for something a little more exotic. A Surly Hub (http://www.ison-distribution.com/english/product.php?part=HUSURTDS) had fired my imagination but there’s also a certain buzz to be had from being resourceful, dare we say thrifty?

At John's house, with components ready, enter John’s unused hub. Sealed bearings, 32 holes and a perfect match for those 32, 282mm Halo spokes provided by Lloyd at Ison distribution. Bit of a no-brainer really.
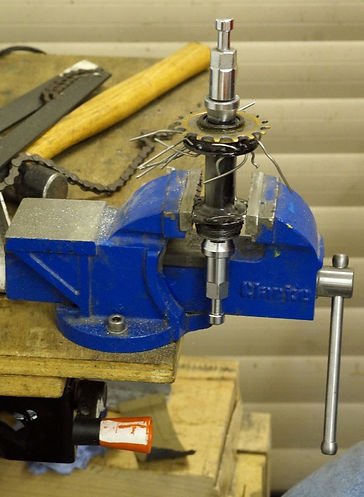
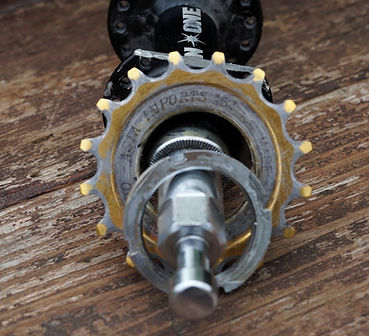
I wanted to reclaim the seemingly seized EAI Gold medal sprocket from the ailing On-One Inbred hub. To cut a long story short, it was right royally stuck. After some careful calculations, he resorted to the angle grinder.

Having established the hub was essentially scrap, her cut one flange square and placed it within his vice. Next came repeated, controlled force from a punch and mallet, shifting the lockring. The sprocket was then liberated, using his extra-long, home-brewed chain-whips.

The builder
John’s father had built spoked wheels for cars and motorcycles at one point and John had gleaned a lot from observing him. More recently, he built hundreds of wheels at the Coventry Peace House.
Patterns
A 3x spoke pattern is his preferred configuration, purely on the grounds of strength/reliability. I’m a firm believer in not trying to cajole, or persuade someone into doing something they have strong reservations about. However, fate had other ideas.
Stage1
Before you do anything else, its good practice to lubricate the spoke threads. It’s a hotly debated topic, with some folks advocating loc-tite, or polymer based grease.
Ideally, a specialist, spoke prep should be employed, preventing them from moving during the first few road miles. We’ve decided to opt for a middle-weight chain lube, which will prevent seizure in the longer term and allow the wheel to be trued, as necessary, at a later stage.
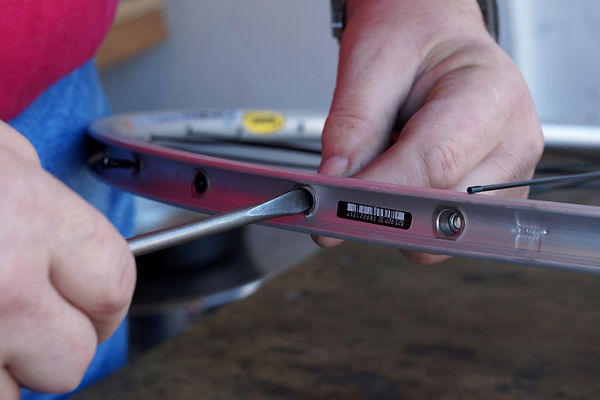
John begins by placing the hubs’ solid axle into a hole bored into a table top. Then he places the rim around it, feeding a series of spokes into my designated drive side. The first should be fed one hole from the valve drilling, unless of course you feel tyre inflation should be a challenge!
The donor hub is unbranded, thus a moot point. Otherwise, the hub logo would also need to be aligned with the valve hole. This is primarily aesthetic. However, this attention to detail is what I’d expect of a wheel builder worth their salt. Put another way, I’d be worried about the wheel’s integrity if they weren’t so exacting at this point.
Stage 2
Wheels must be built in sections, starting with the drive (sometimes known as pull) side, which, you guessed it, deliver the power. John laces “heads out”; which is another good, basic practice. Why? Well, should the chain bail from your cassette, or otherwise collide with the spokes, damage will be, at worst, minimal.
Stage 3

With the key spokes engaged, John starts lacing spokes, every other hole at the hub flange, every fourth rim hole. Pros might do this sort of build in their sleep but sometimes it’s worth taking stock and having a break. School boy errors are much easier to correct at this point.
Stage 4

With the drive side in situ, it’s time to load up the non-drive side. As before, start by lacing the first, non-drive spoke one hole away from the rim’s valve drilling. However, make sure it’s behind this time.
Stage5
Time to start working on the lead, non-drive side spokes. Received wisdom says heads in, elbows out - theirs, not yours! That said, this depends on the direction you laced your drive side. John is building mine, two-cross so, as with 3 and 4 cross patterns, the lead spoke is fed underneath the last cross i.e. over and under, or over, over and then under etc.

Obviously, this wouldn’t apply on a radial pattern. Once John has fed them through and cast a critical eye, he moves to the final quarter; the drive side. Same as before, last crossing under the pull spokes.
Tensioning
This is a relatively straightforward, though essential exercise. Work around the wheel, bending the elbow of every head. Doing so ensures the wheel can be properly stress-relived later on. Up until this point, the work can be done, pretty much anywhere you find comfortable but now calls for a truing jig.
John has a professional quality Park unit, which is ideal but it’s possible to perform this and the truing phase using an old but straight fork with brake calliper, held in a vice, or “Workmate” type stand.
Home enthusiast jigs are very portable and can be had for around £50. An outlay easily recouped with a few uses and will make you very popular with your mates. Fine for taming bigger wobbles. However, they tend to be slightly whippy, so expect to settle for 1.3-1.5mm of up/down, or sideways play.
John works around the wheel, one nipple at a time and starting at the valve hole; winding the non-drive side just tight enough until they barely obscure the spoke threads.
He repeats on the drive side, adding the same amount of tension. There’s no magic formula top this and will depend on factors, such as spoke length. John recommends newbies play it safe, one turn a time.
Stress Relief
After a few repetitions, spoke tension increases quite noticeably and at this stage, it’s time to stress relieve the wheel again. The easiest way is to simply pull the spokes together, towards the hub centre.


Every full revolution, add another turn to the spoke nipples and stress relieve again. In this instance, John has set my wheel between 90 and 110 KGf (kilograms force)

Tension should always be measured using a tension-meter, which will provide an exact reading of the overall and relative tension. This is an essential, ongoing process and not one that can be left right until the end.
As a rough guide, tensions must be consistent-anything greater than a 10% differential runs a very real risk of the wheel warping at some, later stage.
When the wheel won’t go out of true, your stress relieving marathon has ended. John has the wheel running true- within 0.2mm.
Grand finale

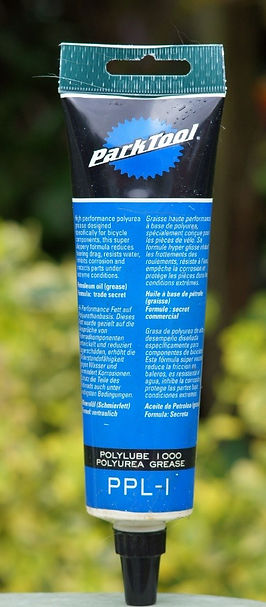
White Lightning Crystal Grease, as used on the Halo hub threads was my default.
However, I’d managed to misplace the tube in all this excitement. Hence, the new hub threads received a liberal basting of Park PPL1.

Galvanic corrosion (where metals of different parentage seize) is to be avoided, at all costs. Lessons have been re-enforced, so I vow to strip, inspect and replenish every three months. Watch this space...
Otherwise and save for some rim tape and a 30mm tyre, we are ready for road testing. John reckons there might be some bedding in and spoke stretch during the formative miles. This will necessitate another quick tweak on the jig but nothing out of the ordinary.